Category Archives: Microsoft Deployment Toolkit (MDT)

PowerShell: Automate Naming of Captured WIM File During MDT Reference Image Creation

If you’re Old Skool like me and still use MDT to produce Windows 10 Reference Images then this script may be useful to save some time and hassle.

The script basically automates the creation of the filename for the backup WIM file so that all that is required to produce a new image bi-annually (or as often as you like) is to run a Build & Capture Task Sequence which (providing the VM has access to WSUS or Microsoft Update) will include the all the latest patches.

It produces a filename in the following format which includes the Windows 10 version being captured, architecture, language and the date.

W10X64_20H2_en-GB_19042.572_2020-10-22_1525.wim

Because the date includes the time the image is captured, the filename will always be unique so there will never be an occasion where the image can’t be captured to a pre-existing WIM file being present with the same name.

The net result is that the Reference Image creation can be as simple as booting a VM, choosing a Task Sequence then collecting the WIM file it produces at the end of the process.

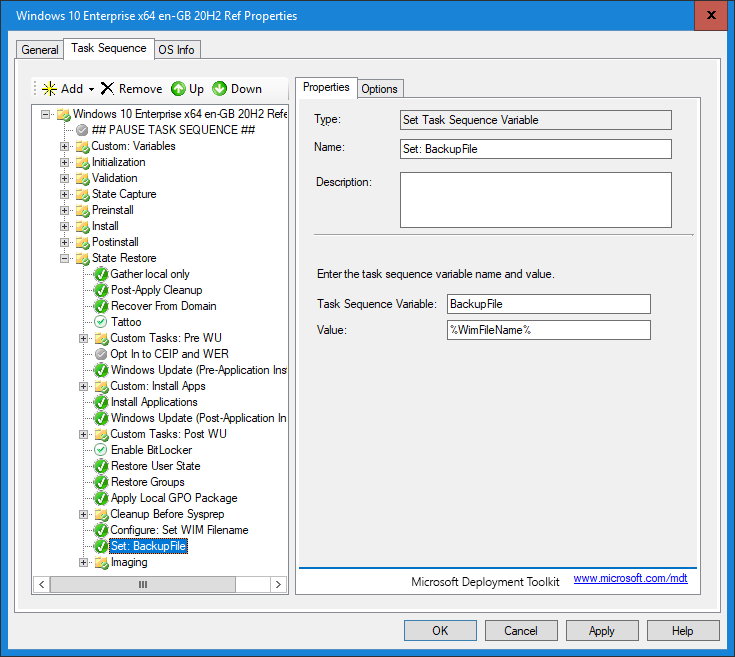
The script produces an MDT variable called ‘%WimFileName%‘ which is then used to populate the ‘BackupFile‘ property in the Task Sequence – this is demonstrated in the images below:

Configure: Set WIM Filename
Set: BackupFile

The script content is embedded below. Copy and paste into a blank text file and save as ‘Pwsh-SetWimFilename.ps1‘ and copy it into your MDT Deployment share in the following location:

DeploymentShare\Scripts\Custom

Script Content:

<#
.DESCRIPTION
    Script to automate the naming of the WIM File Name during MDT OSD
.EXAMPLE
    PowerShell.exe -ExecutionPolicy ByPass -File <ScriptName>.ps1 [-Debug]
.NOTES
    Author(s):  Jonathan Conway
    Modified:   17/11/2021
    Version:    1.5

    Option [-Debug] switch can be run locally to output results to screen to test WIM File Name is correct
#>

Param (
    [Switch]$Debug
)

Begin {

    # Variables: Information from Registry
    $OsRegistryInfo = Get-ItemProperty -Path 'HKLM:\SOFTWARE\Microsoft\Windows NT\CurrentVersion'
    [string]$DisplayVersion = $OsRegistryInfo.DisplayVersion
    [string]$ReleaseId = $OsRegistryInfo.ReleaseId
    [string]$Ubr = $OsRegistryInfo.UBR
    [string]$EditionId = $OsRegistryInfo.EditionID
    [string]$OsCurrentBuildNumber = $OsRegistryInfo.CurrentBuildNumber

    # Variables: Change 'ReleaseID' to new Windows Release naming format if Windows 10 20H2 or later
    if ($ReleaseId -gt '2004' -and $ReleaseId -lt '2009') {

        if ($ReleaseId -match "^(..)(01|02|03|04|05|06)$") {
            [string]$ReleaseId1stHalf = $ReleaseId.Substring(0, 2)
            [string]$ReleaseId2ndHalf = $ReleaseId.Substring(2, 2)
            [string]$ReleaseId2ndHalfReplaced = $ReleaseId2ndHalf -replace "$ReleaseId2ndHalf", "H1"
            [string]$ReleaseId = "$ReleaseId1stHalf" + "$ReleaseId2ndHalfReplaced"
        }

        if ($ReleaseId -match "^(..)(07|08|09|10|11|12)$") {
            [string]$ReleaseId1stHalf = $ReleaseId.Substring(0, 2)
            [string]$ReleaseId2ndHalf = $ReleaseId.Substring(2, 2)
            [string]$ReleaseId2ndHalfReplaced = $ReleaseId2ndHalf -replace "$ReleaseId2ndHalf", "H2"
            [string]$ReleaseId = "$ReleaseId1stHalf" + "$ReleaseId2ndHalfReplaced"
        }

    }

    elseif ($ReleaseId -ge '2009') {
        $ReleaseId = $DisplayVersion
    }

    # Variables: Information from WMI
    $OsWmiInfo = Get-CimInstance -ClassName 'Win32_OperatingSystem'

    # Variables: OS 'Caption' information
    $Caption = $OsWmiInfo.Caption
    [String]$RegExPattern = '(Microsoft\ (Windows|Hyper-V)\ (10|11|Server\ (2016.*?|2019.*?)))'
    [String]$MachineOS = ($Caption | Select-String -AllMatches -Pattern $RegExPattern | Select-Object -ExpandProperty 'Matches').Value

    # Variables: Media Language
    [string]$OsLanguageNumberCode = $OsWmiInfo.OSLanguage

    if ($OsLanguageNumberCode -eq '2057') {
        $OsLanguage = 'en-GB'
    }
    if ($OsLanguageNumberCode -eq '1033') {
        $OsLanguage = 'en-US'
    }

    # Variables: Date Information
    $BuildDate = Get-Date -Format "yyyy-MM-dd_HHmm"

    # Variables: OS Architecture
    if ($OsWmiInfo.OSArchitecture -eq '64-bit') {
        $Architecture = 'X64'
    }
    if ($OsWmiInfo.OSArchitecture -eq '32-bit') {
        $Architecture = 'X86'
    }

}

Process {

    # Microsoft Hyper-V Server
    if ($MachineOS -like 'Microsoft Hyper-V Server*') {
        # Variables: Set OS Prefix
        $HypervPrefix = 'HVS'

        # Variables: Set Windows Server Version
        $WindowsServerVersion = $MachineOS.TrimStart("Microsoft Hyper-V Server")

        # Hyper-V Server: Create Wim File Name string
        $WimFileName = "$HypervPrefix" + "$WindowsServerVersion" + "$Architecture" + '_' + "$OsLanguage" + '_' + "$OsCurrentBuildNumber" + '.' + "$Ubr" + '_' + "$BuildDate" + '.' + 'wim'
    }

    # Microsoft Windows 10
    if ($MachineOS -like 'Microsoft Windows 10*') {
        # Variables: Set OS Prefix
        $Os = 'W10'

        # Variables: OS Edition
        if ($EditionId -eq 'Enterprise') {
            $Edition = 'ENT'
        }
        if ($EditionId -eq 'IoTEnterprise') {
            $Edition = 'IOT'
            $ReleaseId = $OsRegistryInfo.DisplayVersion
        }
        if ($EditionId -eq 'EnterpriseS') {
            $Edition = 'IOT'
            $Channel = 'LTSC'
        }
        if ($EditionId -eq 'Professional') {
            $Edition = 'PRO'
        }

        if ($EditionId -eq 'EnterpriseS') {
            # Windows 10 IoT LTSC: Create Wim File Name string
            $WimFileName = "$Os" + "$Architecture" + '_' + "$Edition" + '_' + "2019" + '_' + "$Channel" + '_' + "$OsLanguage" + '_' + "$OsCurrentBuildNumber" + '.' + "$Ubr" + '_' + "$BuildDate" + '.' + 'wim'
        }
        else {
            # Windows 10: Create Wim File Name string
            $WimFileName = "$Os" + "$Architecture" + '_' + "$Edition" + '_' + "$ReleaseId" + '_' + "$OsLanguage" + '_' + "$OsCurrentBuildNumber" + '.' + "$Ubr" + '_' + "$BuildDate" + '.' + 'wim'
        }

    }

    # Microsoft Windows 11
    if ($MachineOS -like 'Microsoft Windows 11*') {
        # Variables: Set OS Prefix
        $Os = 'W11'

        # Variables: Set Display Version
        $OsDisplayVersion = $OsRegistryInfo.DisplayVersion

        # Variables: OS Edition
        if ($EditionId -eq 'Enterprise') {
            $Edition = 'ENT'
        }
        if ($EditionId -eq 'IoTEnterprise') {
            $Edition = 'IOT'
        }
        if ($EditionId -eq 'Professional') {
            $Edition = 'PRO'
        }

        # Windows 10: Create Wim File Name string
        $WimFileName = "$Os" + "$Architecture" + '_' + "$Edition" + '_' + "$OsDisplayVersion" + '_' + "$OsLanguage" + '_' + "$OsCurrentBuildNumber" + '.' + "$Ubr" + '_' + "$BuildDate" + '.' + 'wim'
    }

    # Microsoft Windows Server
    if ($MachineOS -like 'Microsoft Windows Server*') {
        # Variables: Set OS Prefix
        $ServerPrefix = 'WS'

        # Variables: Set Windows Server Version
        $WindowsServerVersion = $MachineOS.TrimStart("Microsoft Windows Server")

        # Windows Server: Create Wim File Name string
        $WimFileName = "$ServerPrefix" + "$WindowsServerVersion" + "$Architecture" + '_' + "$OsLanguage" + '_' + "$OsCurrentBuildNumber" + '.' + "$Ubr" + '_' + "$BuildDate" + '.' + 'wim'
    }

}

End {

    # If Debug is true then write WIM file name to host
    if ($Debug) {
        Write-Host "Caption is:         `"$Caption`"" -BackgroundColor 'Green' -ForegroundColor 'Black'
        Write-Host "MachineOS is:       `"$MachineOS`"" -BackgroundColor 'Green' -ForegroundColor 'Black'
        Write-Host "MachineOS is:       `"$EditionId`"" -BackgroundColor 'Green' -ForegroundColor 'Black'
        Write-Host "WIM File Name is:   `"$WimFileName`"" -BackgroundColor 'Green' -ForegroundColor 'Black'
    }

    else {
        # Set MDT Task Sequence Variable to be used to populate 'BackupFile'
        $tsenv:WimFileName = "$WimFileName"
    }

}

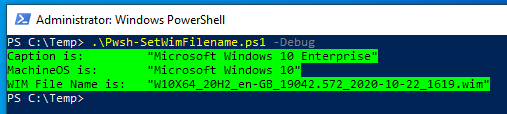
It is possible to test the output of the script by copying the script onto a device and running it with the ‘-debug’ switch. This will display the WIM Filename in the PowerShell console so you can check to see if it is correct:

Debug Script Output

/ JC

PowerShell Gather: Moving Away from MDT-Integrated Task Sequences in Microsoft Endpoint Configuration Manager (MECM)

I’ve been a huge fan of MDT over the years and still use it to create my Windows Reference images to this day as it’s so straightforward for me to make tweaks to a WIM file if I need to.

Historically I have always recommended and implemented MDT-Integrated Task Sequences in Configuration Manager to take advantage of all the additional capabilities that MDT provides.

Recently though I have started to move to using a standard MECM OSD Task Sequence as they are so much more simple and require less maintenance.

The most useful thing from MDT Integration that I use day-to-day for OSD is the ‘MDT Gather’ step to collect information about the device and deployment at various points in the Task Sequence. This allows various aspects of a deployment to be controlled dynamically based on numerous pre-defined variables such as the classic IsDesktop/IsLaptop scenarios etc.

The downside to this is the steps require a MECM Package to be created and maintained plus it adds unnecessary time to the deployment when downloading the Toolkit Package.

It is possible to retain this useful capability by replacing the MDT Toolkit/Gather steps with a PowerShell script which can be added directly into the ‘Run PowerShell Script’ Task Sequence step and that’s why I’m here writing this post 🙂

I found a script which was created by Johan Schrewelius (with contributions from various others) which did the majority of what I wanted. His script can be accessed on the Technet PowerShell Gallery (Link).

By reworking this script and adding functionality that I specifically needed, I now have a lightweight and solid ‘Gather’ solution which can be easily added to any MECM Task Sequence.

v1.0 of the script collects the following information. The example is one of my lab devices so you can see what the info looks like. I expect this list to expand over time as new requirements crop up:

Architecture = X64
AssetTag = CZCXXXXXXX
BIOSReleaseDate = 12/25/2019 00:00:00 -BIOSVersion = N01 Ver. 02.45
BitlockerEncryptionMethod = AES_256
DefaultGateway = 192.168.1.1
IPAddress = 192.168.1.201
IsBDE = True
IsCoffeeLakeOrLater = False
IsDesktop = True
IsLaptop = False
IsOnBattery = False
IsOnEthernet = True
IsServer = False
IsTablet = False
IsVM = False
MacAddress = 48:0F:CF:46:09:F5
Make = HP
Memory = 49031.58203125
Model = HP EliteDesk 800 G2 SFF
OSBuildNumber = 17763.1158
OSCurrentBuild = 17763
OSCurrentVersion = 10.0.17763
ProcessorFamily = 6700
ProcessorManufacturer = GenuineIntel
ProcessorName = Intel(R) Core(TM) i7-6700 CPU @ 3.40GHz
ProcessorSpeed = 3408
Product = 8054
SerialNumber = CZCXXXXXXX
UUID = D41CCC6A-E086-13G5-9C43-BC0000EE0000
Vendor = HP
VMPlatform = N/A

I’ve been using it with customers for a while and am happy now that it’s robust/mature enough to be shared on GitHub for others to use as well if they want to:

https://github.com/jonconwayuk/PowerShell_Gather

It can be added into a Task Sequence as per the image below using the ‘Run PowerShell Script’ step with the Execution Policy set to ‘Bypass’. Each time it runs, it will add the collected variables into the running Task Sequence environment and can be used throughout the Task Sequence:

‘Run PowerShell Script’ Step with Pwsh-Gather.ps1 script added

Below is an example of how variables can be utilised – in this example the condition is to control some BitLocker tasks which I only wanted to run on physical devices which are also laptops:

Conditions using Gather Variables

It also creates a log file (Pwsh-Gather.log) in the standard Task Sequence logging directory defined as the built in variable “_SMSTSLogPath” which can be reviewed using cmtrace.exe.

For testing, the script can be run locally on a device by using the ‘-Debug’ parameter as per the example below from an ‘Administrator’ PowerShell prompt:

PS C:\Users\Administrator\Documents\PowerShell_Gather> .\Pwsh-Gather.ps1 -Debug

Feel free to start using the script and let me know if there are any improvements or additions that you’d like to see and I’ll try and accommodate them when time permits. Hopefully people find it useful!

/ JC

Creating Custom WinPE 3.1 Boot Image (For Deploying Windows XP from SCCM 2012 R2) Automated via Batch File

Recently a customer wanted the ability to be able to rebuild Windows XP machines (!) via SCCM 2012 R2 by just adding machines into a rebuild collection.

This doesn’t work out of the box with the version of WinPE that ships with SCCM so to get it to work you need to create a custom Boot image based on WinPE 3.1, add it into ConfigMgr and associate it with the Windows XP Task Sequence – this allows WinPE to pre-stage onto the local disk and for the machine to successfully reboot into it.

The following code can be added into a Batch File and executed as an Administrator to automate the creation of the Boot Image and add the required components.

@echo off

echo:
echo # REMOVE DIRECTORY IF IT EXISTS
echo:

RD C:\TEMP\WinPE\LegacyWinPEx86 /S /Q

echo:
echo # CREATE X86 WINPE FOLDER STRUCTURE
echo:

CALL "C:\Program Files\Windows AIK\Tools\PETools\copype.cmd" x86 C:\TEMP\WinPE\LegacyWinPEx86

echo:
echo # COPY WIM FILE TO ISO\SOURCES DIRECTORY AND RENAME AS BOOT.WIM
echo:

COPY C:\TEMP\WinPE\LegacyWinPEx86\winpe.wim C:\TEMP\WinPE\LegacyWinPEx86\ISO\sources\boot.wim

echo:
echo # MOUNT THE BOOT.WIM FILE IN THE MOUNT DIRECTORY
echo:
Dism /Mount-Wim /WimFile:C:\TEMP\WinPE\LegacyWinPEx86\ISO\sources\boot.wim /index:1 /MountDir:C:\TEMP\WinPE\LegacyWinPEx86\mount

echo:
echo # ADD OPTIONAL COMPONENTS TO WINPE IMAGE
echo:

Dism /image:C:\TEMP\WinPE\LegacyWinPEx86\mount /Add-Package /PackagePath:"C:\Program Files\Windows AIK\Tools\PETools\x86\WinPE_FPs\winpe-wmi.cab"
Dism /image:C:\TEMP\WinPE\LegacyWinPEx86\mount /Add-Package /PackagePath:"C:\Program Files\Windows AIK\Tools\PETools\x86\WinPE_FPs\winpe-scripting.cab"
Dism /image:C:\TEMP\WinPE\LegacyWinPEx86\mount /Add-Package /PackagePath:"C:\Program Files\Windows AIK\Tools\PETools\x86\WinPE_FPs\winpe-wds-tools.cab"
Dism /image:C:\TEMP\WinPE\LegacyWinPEx86\mount /Add-Package /PackagePath:"C:\Program Files\Windows AIK\Tools\PETools\x86\WinPE_FPs\winpe-hta.cab"
Dism /image:C:\TEMP\WinPE\LegacyWinPEx86\mount /Add-Package /PackagePath:"C:\Program Files\Windows AIK\Tools\PETools\x86\WinPE_FPs\winpe-mdac.cab"

echo:
echo # SET SCRATCH SPACE TO 128MB
echo:

Dism /Set-ScratchSpace:128 /Image:C:\TEMP\WinPE\LegacyWinPEx86\mount

echo:
echo # ADD ANY REQUIRED DRIVERS TO THE IMAGE
echo:

Dism /Image:C:\TEMP\WinPE\LegacyWinPEx86\mount /Add-Driver /Driver:C:\TEMP\WinPE\Drivers /Recurse

echo:
echo # UNMOUNT IMAGE AND COMMIT CHANGES
echo:

Dism /Unmount-Wim /MountDir:C:\TEMP\WinPE\LegacyWinPEx86\mount /Commit

/ JC

WinPE Versions Linked to Full OS Versions

WinPE 1.0 [Windows XP] [5.1.2600.x] [First version of WinPE]
WinPE 1.1 [Windows XP SP1] [5.1.2600.x]
WinPE 1.2 [Windows Server 2003] [5.2.3790.x]
WinPE 1.5 [Windows XP SP2] [5.1.2600.x] [Windows PE 2004]
WinPE 1.6 [Windows Server 2003 SP1] [5.2.3790.x] [Windows PE 2005]
WinPE 2.0 [Windows Vista] [6.0.6000.x]
WinPE 2.1 [Windows Server 2008] [6.0.6001.x]
WinPE 2.2 [Windows Server 2008 SP2] [6.0.6002.x]
WinPE 3.0 [Windows 7] [6.1.7600.x] [Windows AIK 2.0]
WinPE 3.1 [Windows 7 SP1] [6.1.7601.x] [Windows AIK Supplement for Windows 7 SP1]
WinPE 4.0 [Windows 8] [6.2.9200.x] [Windows ADK 8.0]
WinPE 5.0 [Windows 8.1] [6.3.9300.x] [Windows ADK 8.1]
WinPE 5.1 [Windows 8.1 Update 1] [6.3.9600.x] [Windows ADK 8.1 Update]
WinPE 10.0.10586 [Windows 10] [1511 – 10586.104] [Windows ADK 10.1.10586.0]

/ JC

$OEM$ Alternative In MDT 2012 U1

So the $OEM$ technique of copying data from a Deployment Share to a machine being deployed is no more.

As an alternative simply use an XCOPY command in your Task Sequence as per the example below (Use a ‘Run Command Line’ step) for the CMTrace tool:

xcopy.exe "%deployroot%\Custom\CMTrace.exe" "C:\Windows\System32" /Q /H /E /I /Y
  • /Q – Does not display file names while copying.
  • /H – Copies hidden and system files also.
  • /E – Copies directories and subdirectories, including empty ones. Same as /S /E. May be used to modify /T.
  • /I – If destination does not exist and copying more than one file, assumes that destination must be a directory.
  • /Y – Suppresses prompting to confirm you want to overwrite an existing destination file.

/ JC

Minimum Permissions Required for Account Used to Join Computers to a Domain During OS Deployment

This account can be used during either MDT Lite Touch deployments using MDT or Zero Touch Deployments via SCCM.

The account requires the following permissions delegated on the OU’s/domain required using the Delegation of Administration wizard or (as in this example) by directly changing the security on particular OUs within the domain.

The account SHOULD NOT be given “Domain Admins” privileges.

In this example I will use a domain account called “CM_DJ” (short for ConfigMgr Domain Join) which starts out with no special permissions other than being a member of “Domain Users”. The account should be restricted from logging into computers via a GPO using the “Allow log on locally” User Rights Assignment item.

In order to view the Security tab in Active Directory Users and Computers enable “View Advanced Features” from the view menu.

AdvancedFeatures

The bullet points below summarise what permissions are required during deployment activities:

  • Add/Remove new computers (“Bare Metal” scenarios)
  • Update existing ones (“Refresh” scenarios)

Open the security tab of the OU you want to give permissions on – this can be done at the domain level if required but for security reasons it is best to limit this to certain parts of Active Directory.

Right-Click the relevant OU and select Properties.

Navigate to the Security tab.

Click on “Advanced“.

Click on “Add” and browse to your account e.g. TESTLAB\CM_DJ (DomainName\JoinAccount)

Choose the following settings:

Choose “This object and all descendant objects

  • Create Computer Objects
  • Delete Computer Objects

ThisObjectAndAllDescendantObjects

Click “OK

Click “Add” again and once more select the “JoinAccount” user.

This time, limit the “Apply Onto” scope to “Descendant Computer objects” and choose the following settings:

  • Read All Properties
  • Write All Properties
  • Read Permissions
  • Modify Permissions
  • Change Password
  • Reset Password
  • Validated write to DNS host name
  • Validated write to service principle name

Perms1

Perms2

Once this has been done the “JoinAccount” (in this example TESTLAB\CM_DJ) will have the required permissions to add, modify and remove computer accounts in the locations you specify and nothing over and above that.

/ JC


## Edit 09/03/2017 ##

Updated to reflect the updated GUI in Windows Server 2012 and later.

## Edit 24/02/2015 ##

To automate this process, check out Johan Arwidmark’s blog where you can download a script that he and Mikael Nystrom wrote to automate the permissions required:

Script to Set AD Permissions for OSD